07:46 26/08/2008
SuperCharge Windows XP
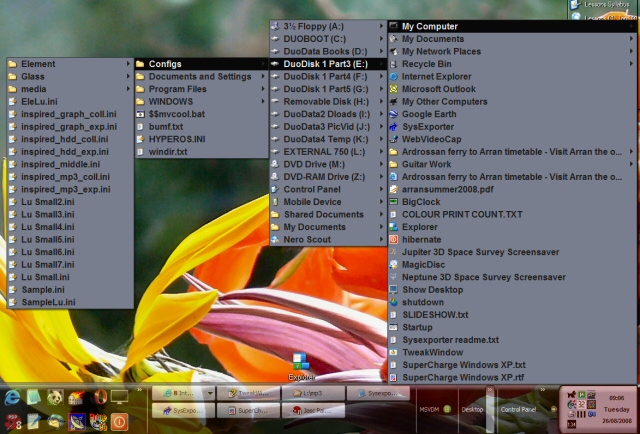
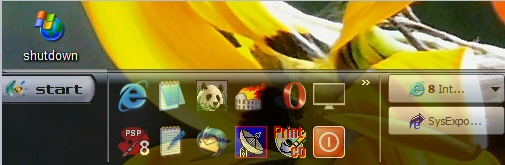
Now that XP is getting a little older and looking a little long in the tooth it is time to upgrade some of it's faltering features and graphics. This is a list of tweaks and upgrades (Mostly freeware) that can easily be made to transform your windows experience. The software and tweaks are arranged in their order of importance. The greatest benefit programs or tweaks are listed first. Please be aware that this article is for new computer users. If you re experienced you will know many of these tweaks already. Then again I've read Windows experts who can't see the reason for having two monitors attached to a system. Bill Gates uses three. Could it be that he and I know that if a monitor goes down the thing that a computer user REALLY needs is a monitor? With a dual (or more) monitors system the extra monitors are not redundant but a fail safe. It is cheaper to buy two 17" monitors than one 22" and you end up with 34" of screen real estate and a safety net if you lose one. Only VERY poor graphics cards do NOT allow dual monitors to be attached. It's been available since Windows 98. The same applies to hard drives. Always buy two smaller drives rather than 1 larger drive. Again this will be cheaper and if your system is set up properly, if a hard drive dies you simply reboot into the other drive. Even if you do NOT have an OS on it, it's a matter of an hour or two to install or copy your backup files to the other drive. (You DO have backup on DVD don't you?) I use a multiple OS handler running several 'virtual' copies of Windows so if one hard drive dies I would simply reboot to another drive with a different copy of Windows XP on it. Many users are unaware of simple tweaks for XP that make using it SOOO much easier. Here's the native tweaks that you can make without installing software. Turn on Quicklaunch toolbar - Right click on the Taskbar - that's the area to the right of the start key - Choose Toolbars and tick the QuickLaunch option. You will see an area created with 2 or 3 icons in it to get you started. These usually include Internet Explorer, a shortcut to Show the desktop (VERY handy) and Outlook express. These icons can be deleted, grabbed and moved in the Quicklaunch toolbar or right clicked and grabbed and dropped onto the desktop - in which case you get four options whose uses are obvious. More importantly you can add icons, as shortcuts to folders, programs, accessories etc. to the Quicklaunch toolbar. Like me though (especially if you use glasses) the default size of these icons is too small. Another easy fix. Your toolbar MUST still be unlocked to let you see the small separator to the right of the start button. Now right click on that separator and choose - View/Large Icons. Now fine tune Quicklaunch 1.1 Right click the Taskbar - make sure it is NOT locked 1.2 Hover your mouse over the TOP of the taskbar until you see the cursor change to the 'resize' double sided arrow. 1.3Stretch the taskbar to double it's normal size. I would now spend some time choosing the FIRST PRIORITY STUFF that you wish to access with one click from your desktop via the quicklaunch toolbar.. Here's a screenshot of this part of my current taskbar.
The 12 Icons to the right of the
Right click in the taskbar and choose toolbars again then select the Desktop toolbar. This installs a 3rd priority option to let you access any file or folder on your system - Here's another screenshot
You can see the Desktop toolbar is active - it's shown in silver and the grey windows opening out as I follow the path
MyComputer\DuoDisk 1 Part3(E:)\Configs\. A little hint here - do NOT let your cursor hover over the Floppy(A:) drive option. Especially if you have no A: drive. The system will spend several frustrating seconds LOOKING for the A: drive or for a floppy in it if you DO have such a drive.
The next tweak is visible in the above screenshot - Install another toolbar but this time choose the option New Toolbar from the taskbar Toolbar options. After choosing New Toolbar navigate to My Computer in the options box and select Control Panel. You now can access the Control Panel from the taskbar. NB -This should ONLY be used where you do not have naive users or children accessing this desktop. Allowing access to the control panel in this way is powerful but could be misused by an inexperienced user.
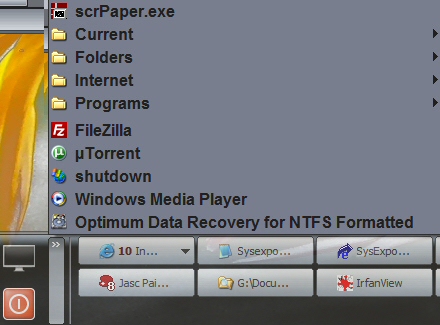
If you look VERY closely to the right of the TV image above the power off sign, you will see a double arrow sign >>. This is a control for yet another layer of Windows prioritising as this links to a toolbar of hidden icons that are in the Quicklaunch toolbar. They are hidden because I have drawn the separator between the running applications area and the Quicklaunch toolbar over to the right to hide them. They're then available from one click on the double arrow sign like the following screen shot.
Notice also the four folders. These were created by me, in the Quicklaunch toolbar to lead to the 4th level of priority. Again they open into the obvious menu options.
You DO have separate logons and control passwords and access for children right? Of course you do. I'm not going into that. This text is mainly about tweaking and improving performance. There are SOME security issues dealt with but SysAdmin stuff is best left to SysAdmin - look elsewhere for this vital data.
Next - Tweaking Windows Explorer (WE). Many people are not aware of this app, but it's the one that I use the most after my browser. It needs certain touches to make it as useful as possible. Launch the program - from Start\All Programs\Accessories Windows Explorer. Now go to Tools on the menu bar and choose the Folder Options view.
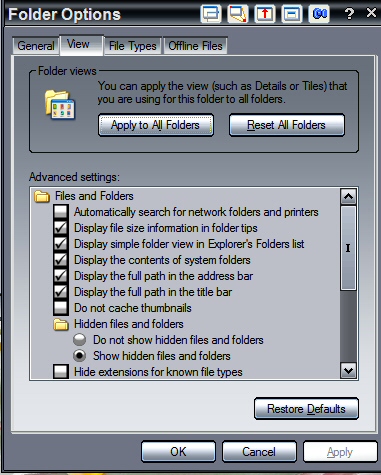
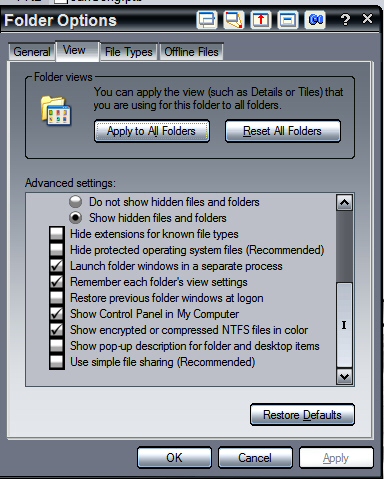
Here are the selections that I make - you may choose differently of course. I use Windows Classic folders view as I dislike the screen real estate that common tasks view uses. Of the other two options here choose what you prefer it's not vital. Next choose the View tab. Here there are several choices that ARE very important. I will list ONLY THE ITEMS THAT I UNTICK HERE, as the options are too numerous to detail them all. I will however mention the absolutely vital options that you need to select and why you should do so.
I SELECT/DESELECT THE FOLLOWING OPTIONS (2 more screen shots)
Here are my reasons for my choices. Disallow network searching unless you require it. It can take a LO_o-O-o NG time and then find nothing anyway.. When you choose to display the contents of system folders Windows will warn you about this. Take the warning to heart. Do NOT do this on a system exposed to naive users. Instead MAKE SURE that this option is NOT enabled. I choose to have Windows cache thumbnails as I sometimes search for images with Windows Explorer and this vastly speeds up searching (After the first time). However be aware that THIS is what causes all those Thumbs.db folders that litter some of your folders. It's safe to delete these by the way. They will just be created again though the next time that you view that folder's contents. The next option requires the same caveat as before. Show hidden files and folders ONLY for experienced users. I would ALWAYS though untick the Hide extensions option (An extender is the three letter suffix appended to a file name that defines the file type. eg .TXT or .rtf or .LOG or .doc are ALL text files. I know that I must be missing something here but I cannot conceive of WHY Microsoft included this option at all. Many, many executable files have icons, DLLs and other files that LOOK EXACTLY THE SAME WITHOUT THEIR EXTENSIONS DISPLAYED. Without the extension one cannot know which file to click on to execute an app. I suppose it MUST be a user protection to limit the user to clicking on what they know but it just seems daft to me. Other options here are mainly obvious (again some have warnings that you should read and decide on sensibly for your own degree of expertise.)
Wheew! After getting through that lot you might need a break. I recommend a good strong coffee and honey. Good for the brain, the throat, the stomach and the heart (If you wash down 1 aspirin).
Back again so soon? Here we go again then.. Still with Windows Explorer(WE) Search for the Views tab. Click on the Down arrow beside it and choose each of the options in turn to see what they do. I only regularly use two of these. Mainly I use details which shows you the Size, Name, Type and Date Modified columns. this is MOST useful because you can sort these columns just by clicking on the column title. I need to mention a wonderful piece of freeware here called Folder Size. Here's the link http://foldersize.sourceforge.net/.
Folder Size addresses a problem that has always bugged me in Windows. Folder Size does what it says after you have installed and activated it you can replace the standard Size column in WE with a Folder Size column. Guess what it does? Right. It shows the size (configurable) of the contents of a folder. This really helps you to control the size of the data that you have stored on your system. It prevents many errors including the MOsT hORRiBLe wINdoWS BUg OF aLl. Just occasionally when using WE you can accidentally pick up a folder and DROP IT INTO ANOTHER FOLDER BY MISTAKE. This can completely cripple your system. It's why all these protections are set up to prevent you writing to, displaying and otherwise altering system folders. Because if the folder that you happen to do this with IS a system folder you can end up with a system that will not boot Windows. Folder Size would immediately show you what you had done. Folder Size is SO useful to me that I would not consider changing to an OS that did not support IT! (eg Vista).
Next - Tidy the Start Programs folder and maintain its contents. Right clicking on the
http://www.microsoft.com/windowsxp/Downloads/powertoys/Xppowertoys.mspx